In my previous blog post, I touched upon some challenges with how NGFW container firewalls are built and how it takes a team of firewall specialists to deploy, configure and maintain the firewall platform. In this blog I will illustrate the challenges in detail and demonstrate the simplicity of the Calico container firewall platform.
Deploying an NGFW container firewall – A sample workflow
Before we look at Calico, just to elucidate the differences between how NGFW firewalls are deployed, let’s look at how the Palo Alto CN-series firewall is deployed and managed. This comparison is solely based on documentation provided by Palo Alto Networks and actual deployment challenges could be beyond the scope of our understanding.
Components required for CN-series firewall
Panorama—A hardware-based or virtual appliance that can connect to the Kubernetes clusters where the applications and CN-Series firewalls are deployed. Panorama is required for license management and configuration management of the CN-Series firewalls
Challenge: Straight off the bat, it is a prerequisite that you either have to purchase or have a Panorama firewall appliance (virtual or physical) in your environment. For DevOps or platform teams who do not manage firewalls on a daily basis, it is a learning curve to get familiar with the Panorama PanOS and the various non-Kubernetes constructs that are present in Panorama so that you can integrate with the CN-series container firewall.
Kubernetes Plugin on Panorama—Because of the rate of change with containerized applications, this plugin is required for visibility into container activity within a cluster and for managing the license token allocation for the firewall deployed on each node within a cluster.
Challenge: This additional component that requires the user to install and configure (A 11 step process) on the Panorama firewall manages the licensing of the CN-firewall pods and translates Kubernetes contextual data to Panorama specific fields so that rules can be applied to traffic.
CN-mgmt and Licensing: A separate tar file is needed to deploy the management plane for the CN firewalls. For licensing, you must have license authentication codes, deployment profiles and a multi step process to create and manage the deployment profiles. All of these steps are dependent on multiple tar and YAML files requiring careful planning and configuration.
Installing the CN-series firewall
Installing and configuring the Panorama appliance is in itself a laborious process requiring at least a day’s worth of understanding and deploying the product. Next you need to install and configure the Kubernetes plugin to integrate with the firewall pods and Panorama. The Kubernetes plugin has about 11 steps albeit a few optional steps including a few templates to use depending on the mode of firewall deployment (as a k8s service, daemonset, CNF, L3 mode).
Palo Alto Networks recommends deploying the CN series as a Kubernetes service instead of a daemonset. Although this approach can work in many cases, it involves some fine tuning and manual work for scale and performance. As a daemonset, you can leverage Kubernetes’ fail-safe mechanism and distributed nature of running a copy of the firewall on all nodes.
Once the Kubernetes plugin is installed, you need to create device groups and collector groups which are Panorama specific configuration for managing the firewall pods and monitoring. Another impediment for critical security use-case is the monitoring interval between the Kubernetes plugin and Panorama.
If during the 30 second interval, an attacker has managed to perform any malicious activity leading to exfiltration, it is too late for the security policy to be applied to the traffic.
How policies are written for CN-series firewalls
Up until now, we have seen how there are multiple hurdles to cross to begin writing policies for traffic control. All this should have been purely DevOps friendly for easy deployment but since there is a heavy dependency on how the NGFW is built, the vendors had to create a complex process to get the firewalls installed in Kubernetes. This is a common challenge across all NGFW vendors and not just the CN-series. Now let’s get to writing policies and securing cluster traffic.
I described how the custom plugin maps Kubernetes data to tags that Panorama can use to create policies. In this page, it is shown how the IP Address-to-tag mapping happens. Although the plugin can extract and map pod level IP addresses, it is an unnecessary burden to add this extra step instead of directly giving users the ability to create policies based on Kubernetes labels and tags. The tag information that is provided by the plugin becomes available as a match criteria for creating policy rules. Policies are written using ‘dynamic address groups’ where allow or deny restrictions are created.
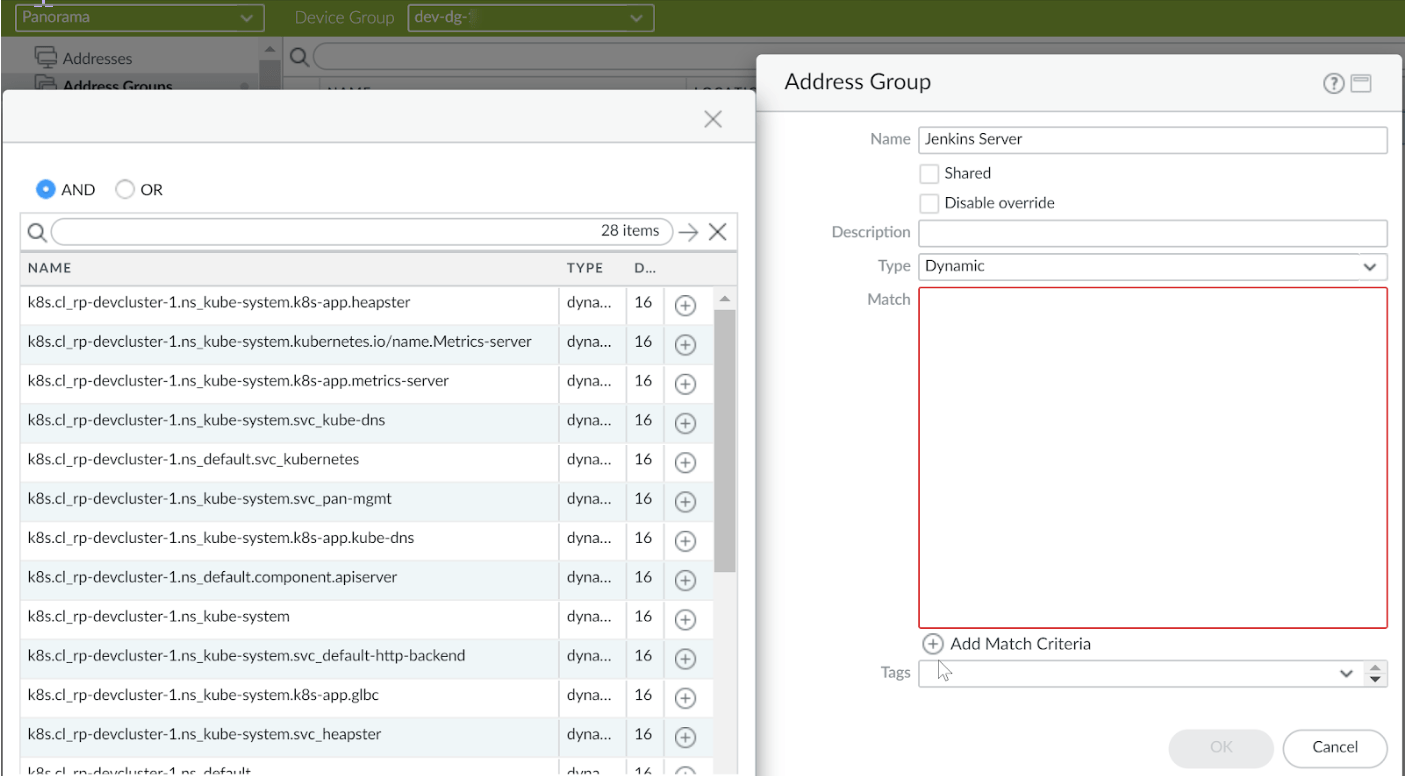
Fig 1: Panorama tags with match criteria configuration
To sum up the workflow for deploying and configuring the CN-series, a simplified timeline is shown below:
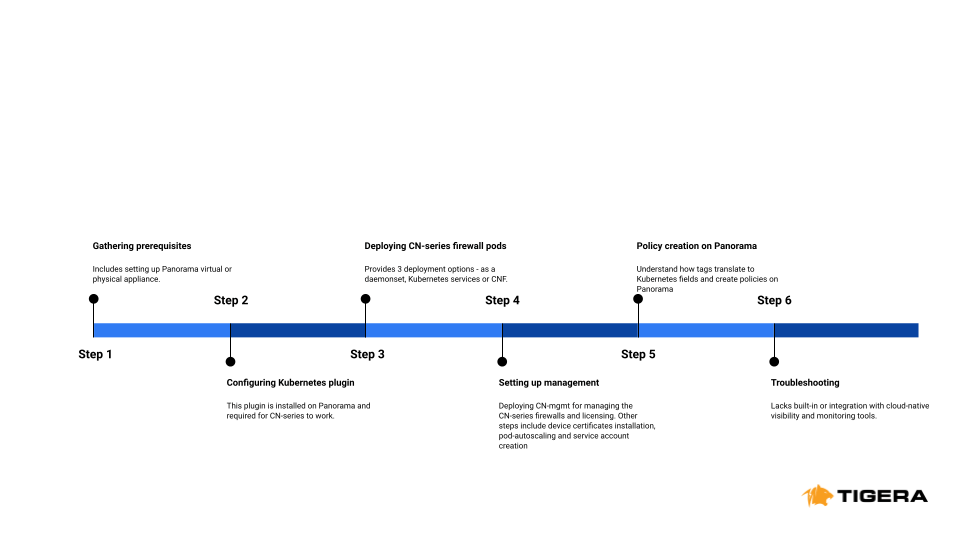
Fig 2: CN-series workflow
Installing and configuring the Calico container firewall
If we make an apples-apples comparison and see how Calico stacks up against the NGFW firewalls in terms of deployment, configuration and writing policies, you will see the minimal effort and understanding it takes to use this plug-and-play container firewall.
Taking into consideration that we have similar prerequisites for the cluster and Kubernetes platform, Calico needs somewhere between 7-8 steps from start to finish. Remember every step in the CN-series workflow is a complex multi-step process requiring hours of configuration. Here is the Calico documentation for installing Calico (with or without Calico CNI) in an EKS cluster.
I have been harping about how a true container firewall needs to be Kubernetes-native not only from an architecture perspective but even how they are deployed and configured. Let me show you with just a few lines of code how Calico Enterprise can be installed from scratch all the way to writing network security policies.
Install Tigera operator and CRDs (Custom Resource Definitions)
kubectl create -f https://downloads.tigera.io/ee/v3.17.2/manifests/tigera-operator.yaml
Install Prometheus operator for monitoring
kubectl create -f https://downloads.tigera.io/ee/v3.17.2/manifests/tigera-prometheus-operator.yaml
Install pull secret
kubectl create secret generic tigera-pull-secret \
    --type=kubernetes.io/dockerconfigjson -n tigera-operator \
    --from-file=.dockerconfigjson=<path/to/pull/secret>
Finally install custom resource
kubectl create -f https://downloads.tigera.io/ee/v3.17.2/manifests/eks/custom-resources.yaml
These simple steps will help you deploy Calico Enterprise on EKS clusters and you can start writing policies to deny, allow traffic. If you are fairly familiar with how Kubernetes works, this entire process will take less than 30 minutes to get up and running!
Authoring policies for allowing, denying inbound/outbound traffic
Writing policies in Calico is super simple. It is in a standard YAML format and looks something like this:
apiVersion: projectcalico.org/v3
kind: GlobalNetworkPolicy
metadata:
  name: default-deny
spec:
  selector: all()
  types:
    - Ingress
    - Egress
The above sample policy is actually the default-deny policy which we recommend as part of our zero-trust approach to workload access. You can start adding an allow policy from here to provide as-needed access to workloads. It could look something like this:
apiVersion: projectcalico.org/v3
kind: GlobalNetworkPolicy
metadata:
  name: deny-app-policy
spec:
  namespaceSelector: has(projectcalico.org/name) && projectcalico.org/name not in {"kube-system", "calico-system", "calico-apiserver"}
  types:
  - Ingress
  - Egress
  egress:
   # allow all namespaces to communicate to DNS pods
  - action: Allow
    protocol: UDP
    destination:
      selector: 'k8s-app == "kube-dns"'
      ports:
      - 53
The advantage with Calico is that with Calico Cloud or Enterprise, we also offer an easy to use UI where you can create these policies. A short gif below explains how:
A container firewall for DevOps
The edge that cloud-native solutions such as Calico have over traditional solutions is that it is built as cloud-native for cloud-native. Traditional network security practitioners either had to use multiple vendors for different use-cases within network security or went with one vendor with multiple tools as add-ons. The different use-cases could vary between application-layer security, vulnerability management, threat defense, denial-of-service (DoS), API security etc. The same situation applies to cloud-native applications where the DevOps or platform teams are constantly evaluating these additional capabilities to bolster network security.
If you were to add advanced functionality such as web application firewall (WAF) or distributed denial of service (DDoS) on top of a traditional container firewall solution such as the CN-series, you either have to buy ‘add-ons’ or another new tool. The challenges are:
- Price – these add-ons need to be purchased separately and could add up quickly to the budget.
- Licensing – you have to deal with extra licenses, SKUs and management of these licenses.
- Management plane – new tools come with new management overhead, learning curve and separate UI.
- Integrate with other cloud-native solutions – need to be designed to integrate with other solutions such as the container firewall, SIEM, SOAR etc
Calico has a convenient way of adding these functionalities with just code (YAML) or single click enablement on the Calico Cloud UI. That way, you get the exact same look and feel of the container firewall with advanced threat protection using behavior-based learning, IDS/IPS integrated with the firewall, deep-packet inspection (DPI) and honeypods, WAF and so on.
Comparison highlights
| NGFW container firewalls | Calico container firewall |
| Multi-step process involving hours or days of installing various components, plugins and hooks just to get started | Simple operator-based installation taking less than an hour to get started |
| Lacks observability into cluster traffic | Full-stack observability with topology rendition in the form of Dynamic Service and Threat Graph |
| Lack of integration with monitoring tools such as Prometheus and Grafana for observability | Complete integration with monitoring tools such as Prometheus and Grafana in addition to Calico’s custom dashboards for observability |
| No simple troubleshooting mechanisms | Built-in Dynamic Packet Capture within the Service Graph for instant troubleshooting |
| Proving compliance can be a complex, time-consuming process | In-built compliance reports and customization for PCI, SOC2, GDPR, NIST and many other compliance frameworks. |
Conclusion
With the constant innovation and growth of container-based applications, container firewalls will continue to adapt and evolve to meet the challenges. As the container ecosystem expands, so does the importance of robust security measures. It’s crucial to stay informed and implement the best practices to safeguard your containerized environments. If you are excited to start your container firewall journey, try our free Calico Cloud experience.
Ready to try Calico node-specific policies? Sign up for a free trial of Calico Cloud.
Join our mailing list
Get updates on blog posts, workshops, certification programs, new releases, and more!